Introduction
Customers may request to have some of their suppliers added to SPIRs Auto-Verification process which means there is no interaction needed for invoices going through the system by the User, this will reduce work for the User and make their life easier when processing invoices.
If they have a supplier on Auto-Verification they can be turned off in the SPIR configuration settings on the server.
Example case:
Hi,
Can you add the following suppliers to auto verify.
BGT001
DIR001
Thanks.
Resolution
Pre-requirements:
Firstly, get access to the SDM server logged in as a User with access to the Sage200Configuration Database (*) .
Note: Ask BP or IT for this access and User account.
In some cases customers will have multiple companies setup in SPIR. It is best to ask the customer which Sage 200 company these suppliers they want adding to Auto-Verification are part of.
Once you know which Sage 200 company these suppliers are part of and you have access to the SDM server you may continue to add these to Auto-Verify.
Steps on adding suppliers to Auto-Verification:
1. Load up Server Administrator and click on the 'Recognition..' tab at the bottom:
2. Click on System Configuration and the following window shall appear:
Here it will display the Sage companies setup in SPIR..
In this example we have Homestyle Sage with the Company ID of 3:
 * To know if you have access to the Sage200Configuration Datebase you will see the Company IDs in the Sage 200 Companies box.
3. Locate over to the Supplier Options Tab and click 'Add':
Note: The customer may already have some suppliers on Auto-Verify.
4. Once you click add the following screen will open:
In our case:
Company ID = 3
Account Code/Supplier Reference = BGT001
Note: You can only add 1 supplier at a time.
Then you have the following Radio buttons:
"Confirm Nominal Analysis"
"Confirm Project Analysis"
"Load Line Items from PO" - THIS ONE CAN BE IGNORED
To be able to put a supply on Auto-Verify, you will want to select No for both:
"Confirm Nominal Analysis" No
"Confirm Project Analysis" No
So it looks like the following:
Note: To take suppliers off Auto-Verification, this may be needed for testing. You can just select "Yes" & "Yes" on the radio buttons.
Then click OK to confirm and it should look similar for this once you have completed the same process for the other suppliers:

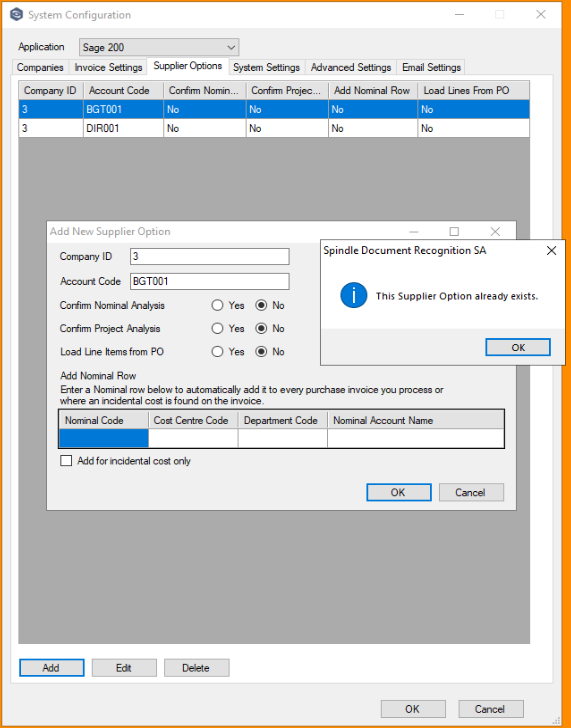
Note: If you try to add a supplier that is already in the list, you will get the following error message when attempting to confirm OK:

Finally, once you are finished with all those you can click "OK" again at the bottom and attempted to restart the services.

Just click "Yes" and wait...
Once the services have started just click "OK" once more and you are okay to close everything down and let the customer know that the suppliers have been added to Auto-Verify.
Knowledge Base Article Details
| Related Product | Spindle Purchase Invoice Recognition |
| Reference Number | KBA-11-02-016 |
| Document Date | 13/09/2024 |
| Original Author | Dylan Thompson |
| Document Version | 1.0 |
| Last Updated | 13/09/2024 |
| Update Author | |
| Keywords | Auto Verify, Automation |
Was this article helpful?
That’s Great!
Thank you for your feedback
Sorry! We couldn't be helpful
Thank you for your feedback
Feedback sent
We appreciate your effort and will try to fix the article